Publishing Your Site
The pipeline produces a complete static website in the _output/ directory. Deploying it is as simple as copying that folder to a web server.
GitHub Pages
The scaffold includes a ready-to-use GitHub Actions workflow at .github/workflows/deploy.yml. It runs automatically on every push to main:
- Checks out your repository (including XSLT stylesheet submodules)
- Installs EFES-NG
- Runs the pipeline (
efes-ng run) - Deploys
_output/to GitHub Pages
The site URL will be https://your-username.github.io/your-repo-name/. The PATH_PREFIX environment variable is set automatically so all links work correctly in the subdirectory.
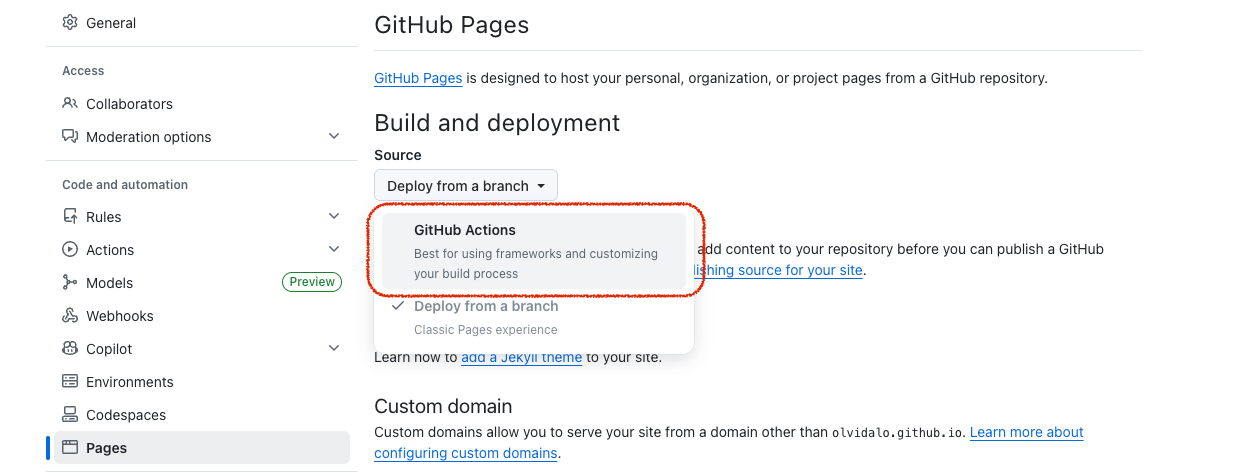
Setup
- Go to your repository on GitHub
- Click Settings > Pages
- Under Source, select GitHub Actions
If you already pushed before enabling Pages, go to Actions > Deploy to GitHub Pages > Run workflow to trigger the first build manually.
Watching the Build
After pushing, go to the Actions tab to see build progress. Click on a workflow run to see detailed logs.
Manual Builds
You can trigger a build without pushing: Actions > Deploy to GitHub Pages > Run workflow.
Clean Builds
If your build fails repeatedly or your site shows stale content (for example after renaming or deleting template files), a cached build artifact might be the cause. Try a clean build first:
- Go to Actions > Deploy to GitHub Pages > Run workflow
- Check Clean build (ignore caches)
- Click Run workflow
This skips all build caches and reprocesses everything from scratch.
Build Caching
The first build will take a while (several minutes for large collections) because it processes every file from scratch. GitHub's CI servers are also slower than your local machine, so expect it to take longer than local builds.
After the first build, the workflow caches the full build state:
- EFES-NG installation: Cached until the framework is updated.
- Pipeline build state: Compiled stylesheets, transformed files, and the assembled site. On the next build, only files you actually changed are reprocessed.
Subsequent builds after small content changes should complete much faster.
Custom Domain
To use your own domain (e.g., seals.example.org) instead of your-username.github.io:
In your repository Settings > Pages, enter your custom domain
Add a
CNAMEfile to your project'ssource/website/directory containing just the domain name:seals.example.orgRemove or clear the
PATH_PREFIXin the workflow file (your site is now at the root, not a subdirectory):yaml- name: Build site run: efes-ng runConfigure DNS with your domain provider (GitHub's documentation covers this in detail)
Manual Deployment
Copy the contents of _output/ to any web server:
# Example: rsync to a server
rsync -av _output/ user@server:/var/www/my-edition/
Subdirectory Deployment
If deploying to a subdirectory (e.g., example.com/my-edition/), set the PATH_PREFIX environment variable before building, or use the Export feature of the Desktop Application to make sure all links on the generated site work:
Using the Desktop Application
The desktop app's Export button builds the pipeline and saves the output to a folder of your choice, with optional path prefix for subdirectory deployment. See Desktop Application.
Using the CLI
PATH_PREFIX=/my-edition/ efes-ng runThis ensures all internal links use the correct prefix.